
Table of Contents
In today’s world, sustainability and creativity go hand in hand. One trend that’s been gaining momentum is upcycling—transforming discarded items into functional, beautiful objects. Whether you’re an eco-conscious individual or simply someone who enjoys crafting, upcycling can offer endless possibilities. One of the best ways to repurpose materials is by creating your own DIY upcycled jewelry box. Not only does it help reduce waste, but it also allows you to design a unique, personalized piece that adds character to your space.
This article will guide you through creating your own DIY upcycled jewelry box and share some innovative upcycled jewelry ideas, including projects using aluminum cans and even car dash panels. So, if you’ve ever wondered how to turn trash into treasure, keep reading!
What Is a DIY Upcycled Jewelry Box?
A DIY upcycled jewelry box is a handmade storage container crafted from repurposed materials that would otherwise go to waste. It’s not just about keeping your jewelry organized; it’s also about giving new life to everyday items and making a positive environmental impact.
Definition and Benefits of Upcycled Jewelry Boxes
Upcycling is the process of taking discarded items or waste materials and transforming them into something of higher value, both artistically and functionally. A DIY upcycled jewelry box fits this definition perfectly, as you’re taking materials that might be considered trash and turning them into a stylish, practical item.
Benefits of Creating an Upcycled Jewelry Box:
- Eco-Friendly: By using recycled or discarded materials, you reduce the need for new resources and help minimize waste.
- Cost-Effective: You don’t need to buy new materials to create a beautiful jewelry box. Items like old cardboard boxes, wooden crates, or even aluminum cans can be repurposed.
- Customizable: Every upcycled jewelry box can be uniquely designed according to your style preferences, allowing for endless creative possibilities.
- Sentimental Value: Repurposing items that have personal meaning can add emotional value to your DIY project.
Types of Materials Used for Upcycling
When it comes to making a DIY upcycled jewelry box, the materials you can use are almost limitless. Here are a few common ones to get started:
- Old Wooden Boxes or Crates: If you have an old wooden crate or small box lying around, it can serve as the perfect base for your jewelry box. Sand it down, paint it, and line it with fabric for a fresh new look.
- Aluminum Cans: Surprisingly, aluminum cans can be cut and shaped into decorative pieces for a jewelry box. You can emboss designs onto them or use them to make compartments.
- Cardboard: Sturdy cardboard from shipping boxes or packaging can easily be transformed into a jewelry box with a little bit of cutting, folding, and decoration.
- Plastic Containers: Instead of throwing out old plastic containers, why not use them as a base? They’re lightweight and easy to customize with paint or stickers.
- Car Parts: Believe it or not, pieces from an old car, such as dash panels, can be used in creative ways for upcycling. This might be a more advanced project, but the results are truly one-of-a-kind.
How to Make a DIY Upcycled Jewelry Box
Creating your own upcycled jewelry box is easier than it seems. By using materials you already have at home, you can craft a personalized jewelry box that not only serves a functional purpose but also reflects your unique style.
Step-by-Step Instructions
Here’s a step-by-step guide on how to make a basic DIY upcycled jewelry box. This project uses simple materials that are easy to find and customize:
Materials You’ll Need:
- Old wooden box or cardboard box
- Paint or wood stain (if using a wooden box)
- Aluminum cans for decoration
- Fabric or felt for lining
- Glue (super glue or hot glue gun)
- Scissors
- Sandpaper (for wood)
- Optional: Embellishments like beads, stickers, or buttons
Steps:
- Prepare the Base: If you’re using an old wooden box, start by sanding the exterior to smooth it out. If you prefer a rustic look, leave some of the imperfections for added character. If using cardboard, cut and fold it into the desired box shape.
- Paint or Stain: Choose a paint color or wood stain that complements your style. Apply a coat of paint or stain evenly on the box and let it dry completely.
- Line the Interior: Measure the dimensions of the inside of your box and cut pieces of fabric or felt to fit. Attach the fabric to the inside using glue, making sure to cover all sides. This will give your jewelry box a soft and polished interior.
- Decorate with Aluminum Cans: Now, let’s get creative! Cut aluminum cans into small decorative shapes—hearts, stars, or even geometric patterns. Use embossing tools or simply press with a pen to create designs on the aluminum pieces. Glue these to the exterior of the box for a shiny, artistic finish.
- Add Embellishments: To further personalize your jewelry box, consider adding beads, stickers, buttons, or any other decorative elements. Attach them securely using glue.
- Final Touches: Allow the glue to dry completely and check for any loose elements. Your upcycled jewelry box is now ready to use!
Essential Tools and Supplies
To make your DIY project a success, it’s crucial to have the right tools and supplies. Here’s a quick checklist of the essentials:
- Cutting Tools: Scissors or a craft knife to cut cardboard, fabric, and aluminum cans.
- Adhesives: Super glue, hot glue gun, or wood glue for securing decorations and lining.
- Decorative Materials: These could include paint, fabric, aluminum can pieces, buttons, and beads.
- Optional Tools: A ruler for precise measurements, a sandpaper block for smoothing wooden surfaces, and a sewing kit if you prefer sewn embellishments.
Upcycled Jewelry from Aluminum Cans
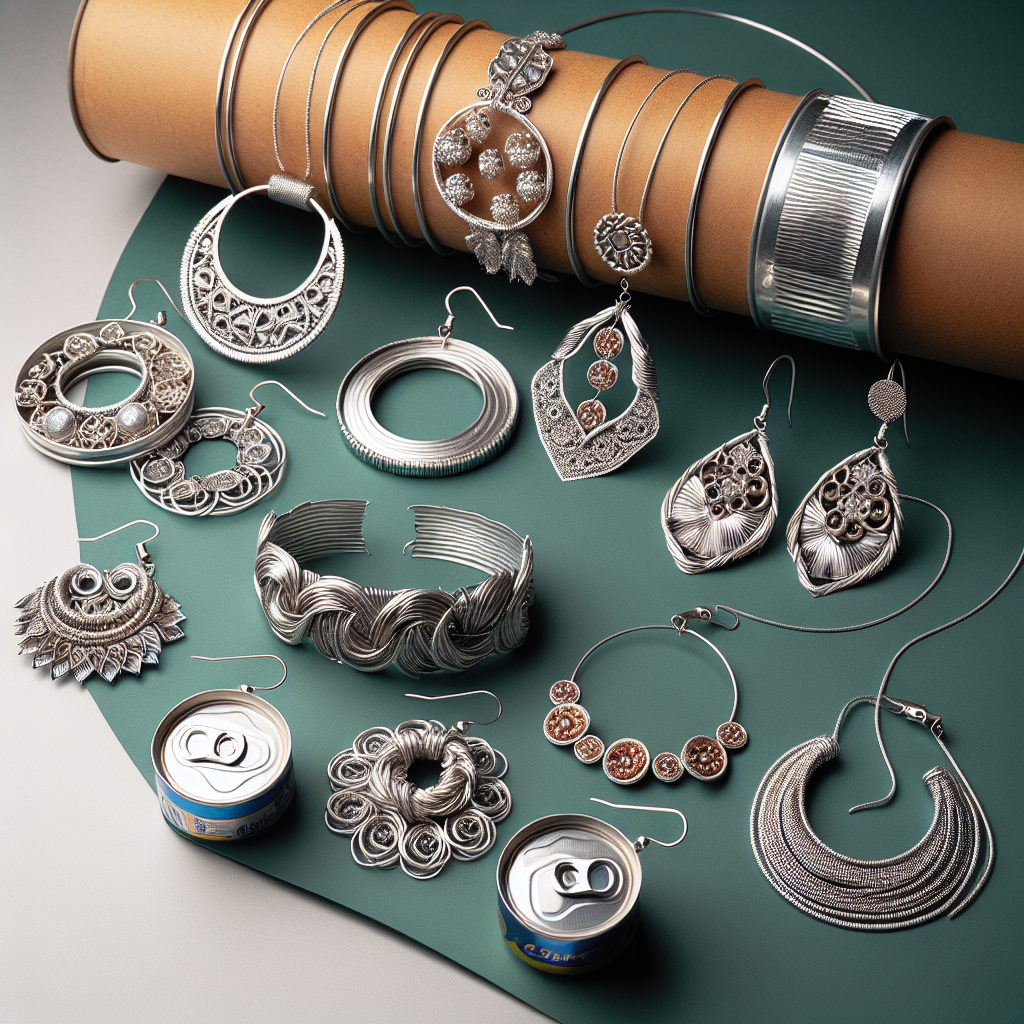
Upcycling isn’t just limited to creating jewelry boxes; it extends to making actual jewelry as well! One of the most creative materials you can use for this purpose is aluminum cans. These cans, which are often discarded after a single use, can be transformed into stunning DIY upcycled jewelry pieces that are as eco-friendly as they are beautiful.
Creative Ideas for Upcycling Aluminum Cans
Aluminum cans provide a versatile and lightweight material perfect for crafting unique jewelry. Here are a few ideas to get you started:
- Aluminum Can Earrings: Cut out small geometric shapes, such as triangles or circles, and attach earring hooks to create trendy statement earrings. You can leave the aluminum as is or paint it for a pop of color.
- Bracelets and Bangles: Carefully cut aluminum cans into strips and shape them into bracelets or bangles. These can be painted, embossed, or wrapped with fabric to create eye-catching designs.
- Necklaces and Pendants: Use larger sections of aluminum cans to craft pendants or charms for necklaces. Emboss patterns or paint them for added flair.
- Rings: Fashion delicate rings by twisting or folding narrow strips of aluminum. This project requires careful shaping, but the results can be stunning.
Step-by-Step Guide for Making Aluminum Jewelry
Materials:
- Aluminum cans
- Scissors or craft knife
- Needle-nose pliers
- Jewelry hooks and clasps (for earrings and necklaces)
- Sandpaper or a nail file (to smooth edges)
- Paint or nail polish (optional)
Instructions:
- Cut and Prepare the Aluminum: Start by cleaning the aluminum cans and cutting them open. Flatten the can with a book or rolling pin to make it easier to work with. Carefully cut out the desired shapes for your jewelry—triangles, hearts, or abstract designs.
- Smooth the Edges: Aluminum can have sharp edges, so use sandpaper or a nail file to smooth them down to avoid injury while wearing your jewelry.
- Shape the Pieces: Depending on the type of jewelry you’re making, shape the aluminum pieces accordingly. You can twist strips into rings, bend them into bangles, or flatten them for pendants.
- Add Decorative Touches: Paint or polish the aluminum for a colorful look, or leave it natural for a sleek, industrial style. You can also emboss the metal with designs by pressing a pen or stylus into it.
- Attach Jewelry Findings: For earrings, attach hooks to the aluminum shapes. For necklaces, use a small hole punch to create a hole for a chain or string.
- Finishing Touches: Assemble the pieces into a complete set, and enjoy wearing your new eco-friendly, upcycled jewelry!
Unique Upcycled Jewelry Ideas for Your Car
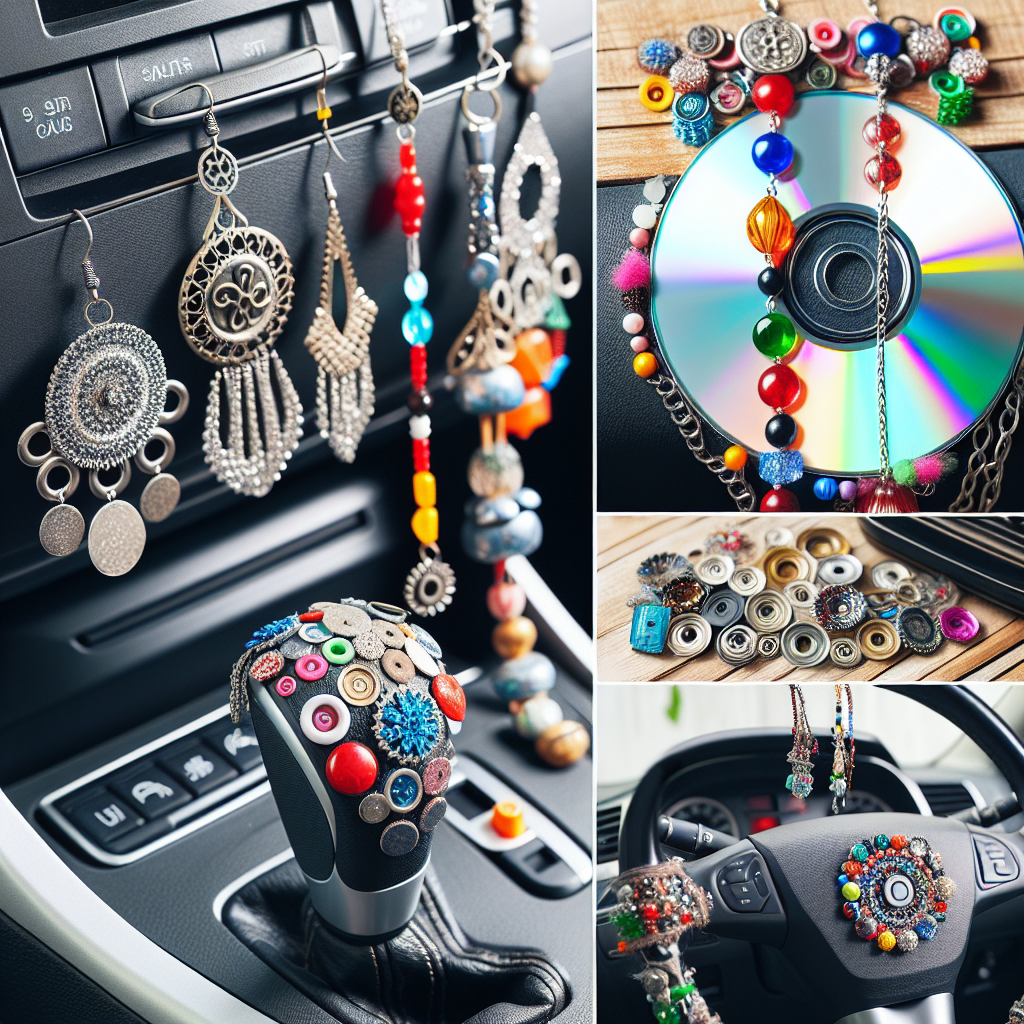
For those who are ready to take their upcycling skills to the next level, car parts offer a fascinating opportunity for creating unique jewelry pieces. One surprising material to work with is the car dash panel, which can be repurposed into edgy, industrial-style accessories.
Car Dash Panels for Jewelry Projects
Car dash panels are typically made from durable, lightweight plastic or metal materials, making them perfect for DIY upcycled jewelry. The texture and color of these materials lend themselves well to creating bold, unconventional pieces.
Here are some exciting ways you can upcycle a car dash panel into jewelry:
- Chunky Pendants: Use sections of the dash panel to create chunky pendants for necklaces. You can leave the material as it is for a rugged, industrial look or paint it for a sleeker design.
- Bracelets from Dash Inserts: Dash panels often have small inserts or vent covers that can be removed and shaped into bracelets or cuffs. These pieces can be sanded down and customized with paint or embellishments.
- Keychains and Charms: Smaller pieces from the dash panel can be used to create keychains or charms. Cut out interesting shapes, such as circles or squares, and drill a hole to attach a keyring or cord.
Additional Car Parts You Can Repurpose
If you’re up for a challenge, other car parts can also be repurposed into jewelry. Here are some ideas to inspire your next upcycling project:
- Seatbelt Buckles: These sturdy metal pieces can be transformed into necklaces or bracelets, especially if you’re going for a bold, mechanical aesthetic.
- Gears and Springs: Small gears, springs, or screws from the interior of a car can be used as design elements in rings, necklaces, or earrings. They add a steampunk flair to any jewelry piece.
- Rearview Mirror Frames: The frame of a rearview mirror can be upcycled into a stylish bangle or bracelet. These frames often have a sleek, modern look, perfect for statement pieces.
Pro Tip: When working with car parts, ensure all materials are thoroughly cleaned and smoothed to avoid sharp edges or rough surfaces that could damage clothing or skin.
Tips and Tricks for DIY Upcycled Projects
While upcycling is a rewarding process, there are some challenges and considerations to keep in mind when working on your DIY jewelry projects. To help ensure the best results, here are some helpful tips and tricks for your upcycling endeavors.
Avoiding Common Mistakes in Upcycling
Upcycling can involve trial and error, but you can avoid some common pitfalls by following these tips:
- Measure Twice, Cut Once: This timeless advice is especially important in upcycling. Whether you’re cutting fabric, cardboard, or metal, be sure to measure accurately to avoid wasting materials.
- Test Adhesives: Not all adhesives work well on every material. Test your glue or adhesive on a small area before applying it to your final project to ensure it holds securely.
- Prep Your Materials: Properly preparing your materials is essential for achieving a polished look. This might include sanding down wooden surfaces, cleaning aluminum cans, or painting over rough areas on a dash panel.
- Don’t Overdo the Decorations: While it’s tempting to add as many embellishments as possible, sometimes less is more. Focus on a cohesive design rather than overcrowding your piece with too many details.
Enhancing Durability and Style
If you want your DIY jewelry and upcycled projects to last, follow these steps to ensure both durability and style:
- Seal Your Work: For projects involving paint, fabric, or metal, a clear sealant can help protect your finished product. This will keep the paint from chipping and prevent wear and tear.
- Use Quality Tools: Investing in proper tools—like sharp scissors, a durable glue gun, or a craft knife—can make all the difference in the quality of your finished product.
- Layering and Textures: To create visual interest, experiment with layering different materials and textures. For example, combining fabric, metal, and wood can add depth to your project, making it stand out.
- Think Outside the Box: Upcycling is all about creativity. Don’t be afraid to experiment with unconventional materials and designs. The beauty of upcycling is that there’s no right or wrong way to do it.
FAQs
What is the best material to use for a DIY upcycled jewelry box?
Wooden boxes or sturdy cardboard are great base materials, as they’re easy to decorate and customize. You can also get creative by using metal or plastic containers.
How do I safely cut aluminum cans for jewelry projects?
Use a pair of sharp scissors or a craft knife, and be sure to smooth the edges with sandpaper or a nail file to avoid sharp edges that could cause injury.
Can I use car parts for other types of upcycled crafts?
Absolutely! Car parts like gears, springs, and metal panels can be used in home décor projects, keychains, or even upcycled furniture.
What type of glue should I use for upcycling projects?
Hot glue works well for most materials, but if you’re working with metal or plastic, consider using a strong super glue or epoxy for added durability.
How can I add color to upcycled jewelry?
You can paint your jewelry pieces using acrylic paints or nail polish. Another option is to use fabric, beads, or paper to cover the pieces for a pop of color.
What tools do I need for making upcycled jewelry?
Common tools include scissors, a craft knife, needle-nose pliers, and adhesives like hot glue or super glue. Depending on the project, you may also need sandpaper, a ruler, or a hole punch.
Conclusion
Upcycling is not just a trend—it’s a sustainable and creative way to transform everyday materials into beautiful, functional items. Whether you’re making a DIY upcycled jewelry box, crafting jewelry from aluminum cans, or experimenting with car dash panels, the possibilities are endless. By repurposing materials, you not only reduce waste but also create one-of-a-kind pieces that reflect your personal style. So, gather your supplies, let your creativity flow, and start turning trash into treasure today!

